Google Sheets Webhooks allow you to receive real-time updates from your Google Sheet without having to constantly poll for changes. With Google Sheets, you can easily store and organize different types of information in the form of spreadsheets.
Additionally, Google Sheets supports app scripting, which allows users to automate their spreadsheets in various ways. As a result, you can deploy your script as a web app with the help of this feature.
This gives you a URL that you can use to make GET or POST requests in order to initiate your script. Plus, you can receive POST requests using this Google Sheets feature without the need for a custom piece of infrastructure. This makes it easier to process data from webhooks.
Consequently, Google Sheets is a powerful tool that allows users to create and edit spreadsheets online. Webhooks are an important part of integrating Google Sheets with other applications.
By using webhooks, developers can receive real-time notifications when a user makes changes to a spreadsheet. This article provides an overview of how to build a Google Sheets webhooks integration.
Introduction to Google Sheets

Google Sheets is a spreadsheet program that is part of the Google Docs suite of productivity tools. The program is available for free, and it can be used online or installed on your computer. Sheets offers all the features you would expect from a spreadsheet program, including the ability to add and format text, insert images, and create formulas.
You can also collaborate with others in real-time, and the program automatically saves your work as you make changes. Whether you're a student working on a group project or a small business owner tracking inventory levels, Sheets is an easy-to-use tool that can help you get the job done.
Key features of Google Sheets:
Some important key features of Google Sheets include:
Automatically saves changes as you type:
Google Sheets automatically saves your work as you type, ensuring that all of your changes are backed up. You can also collaborate with others in real time, and the program will save versions of your work so that you can go back and review previous changes.
Create formulas:
You can use the built-in formula editor to quickly calculate sums, averages, and other complex equations. You can also use conditional formatting to highlight certain cells based on their values.
Insert images:
Google Sheets allows you to insert images into your spreadsheet, making it easier to visualize data or add a personal touch.
Spreadsheet using revision history:
You can view previous versions of a Spreadsheet using Revision History. The date and time of the change, along with the name of the person who made said change, are sorted chronologically.
Provides instant insights into your data:
The Explore panel in Sheets provides insights into your data with just a few clicks. You can view basic stats about your data, create charts and pivot tables, and even identify trends.
Integrate Google Sheets with webhooks:
Google Sheets allows you to easily integrate your spreadsheets with other applications, such as Slack or Zapier, using webhooks. This allows you to receive real-time updates when a user makes changes to a spreadsheet without having to constantly poll for changes.
Multiple users can work on the same Spreadsheet at the same time:
Sheets allow multiple users to work on the same Spreadsheet at the same time. This makes it easy for teams to collaborate and make changes in real-time.
Introduction to Webhooks
Webhooks are a way for an app to provide other applications with real-time information. A webhook is essentially a user-defined HTTP callback: an HTTP POST that occurs when something happens. When that event occurs, the source site makes an HTTP request to the URL configured for the webhook.
In the context of programming, a webhook delivers data to other applications as it happens, meaning you don’t have to periodically poll for data like you would with an API. This makes webhooks much more efficient. They also make it possible for your app to receive data from multiple sources in near real-time.
For example, if you were building a chat app, you could use webhooks to deliver new messages to all connected clients as soon as they are received rather than making each client poll for new messages at some interval.
Webhooks can be used to update an external issue tracker, trigger CI builds, update a backup mirror, or even deploy a new version of your site. They’re extremely powerful and can save you a lot of time and effort.
And because they’re based on standard HTTP requests, they can be used with nearly any programming language. So if you’re looking for a way to streamline your development process, webhooks are definitely worth checking out.
Key features of Webhooks
Some important key features of Webhooks include:
Automatically delivers data:
Webhooks are a great way to ensure that your app is receiving up-to-date information from other sources. They make it possible for you to receive data in near real-time, which can save you lots of time and effort.
Easy to use:
Webhooks are surprisingly easy to set up and use. All you need is a web server that can receive HTTP POST requests and process the data sent by the source.
Versatile:
Webhooks are based on standard HTTP requests, so they can be used with nearly any programming language or framework. This makes them incredibly versatile and powerful.
Secure:
Webhooks use HTTPS requests, which makes them secure and resistant to tampering. This means you can trust that the data being sent is reliable and up-to-date.
Cost-effective:
Because webhooks are relatively simple to set up and manage, they tend to be much more cost-effective than other solutions like APIs. They’re also much less resource intensive, which can save you money in the long run.
Before you begin:
With Boltic, integrating your business with Google Sheets is quick and easy. All you have to do is sign into your Boltic account, click a new Bolt button, add new integration, go to the Integrations page, select Google Sheets, and then click the "Connect" button.
After authenticating with Google Sheets, you will be able to choose the desired spreadsheet from your account and click "Save" to complete the integration. Now, you can start collecting payments through Boltic with a few clicks of a button!
Steps to set up Google Sheets Webhooks Integration
Google Sheets Webhooks Integration is a three-step process that allows users to send data from Google Sheets whenever an event changes. To set up the integration, follow these steps:
- Step 1: Create and Configure a new Document
- Step 2: Publish Your Script
- Step 3: Create a Webhook
Step 1: Create and configure a new document
.webp)
The first step is to create a new document in Google Sheets. This document will be used to store information about the webhooks you create. To do this, open Google Sheets and click on “File” > “New” > “Spreadsheet”. Once your spreadsheet is open, click on the “Tools” menu and select “Script editor”. This will open a new window with a blank script. The next step is to add some code to your script. This code will be used to handle the HTTP requests sent by webhooks. To do this, copy and paste the following code into your script:
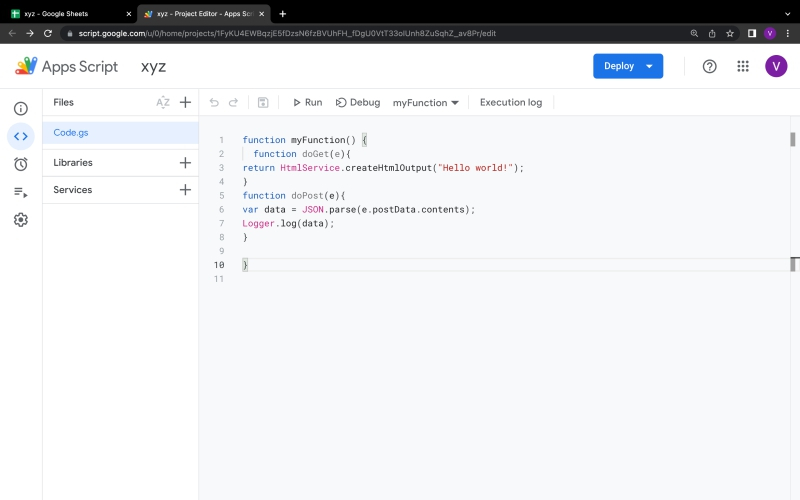
function doGet(e){
return HtmlService.createHtmlOutput("Hello world!");
}
function doPost(e){
var data = JSON.parse(e.postData.contents);
Logger.log(data);
}
This code includes two functions: doGet() and doPost(). The doGet() function is used to handle GET requests, which are typically used to retrieve data from a server. The doPost() function, on the other hand, is used to handle POST requests, which are typically used to submit data to a server. In this case, the doPost() function is used to parse the JSON data sent by webhooks and log it in the Google Sheet.
Step 2: Publish your script
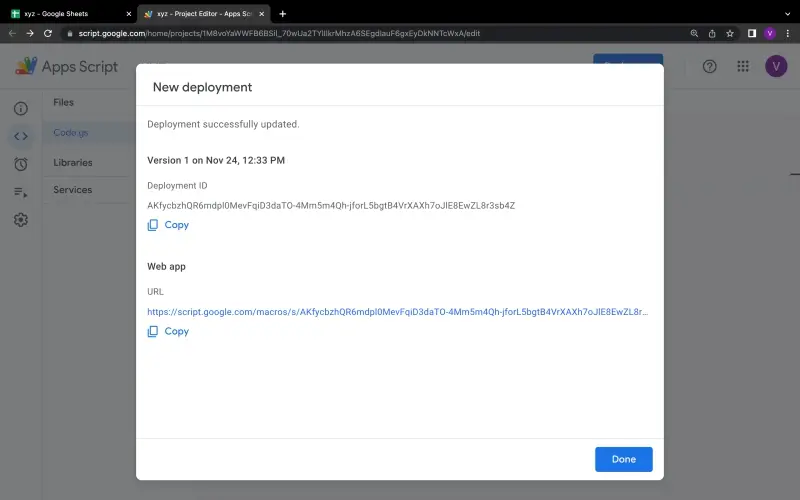
Once you have added the code to your script, the next step is to publish it as a web app. This will allow webhooks to send HTTP requests to your script. To do this, click on the “Publish” menu and select “Deploy as web app…”.
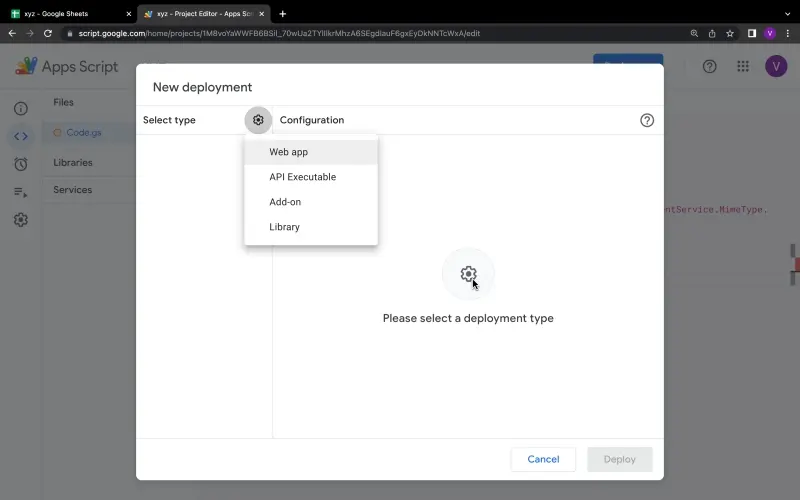
In the “Project version” dropdown, select “New”. In the “Execute the app as” dropdown, select “Your account”. In the “Who has access to the app” dropdown, select “Anyone, even anonymous”. Then click on the “Deploy” button.
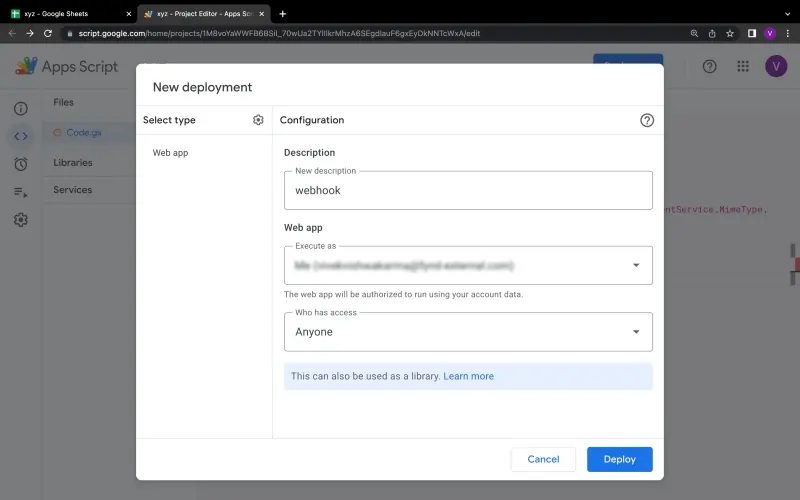
This will open a new window with a URL to your script. Copy this URL and save it for later, as you will need it to configure your webhooks.
Step 3: Create a webhook
The final step is to create a webhook. A webhook is essentially a user-defined HTTP callback: a method for one application to provide other applications with real-time information. To create a webhook, you will need the URL of your script from the previous step. You will also need to specify the events that should trigger the webhook.

For example, if you want your webhook to be triggered when a new row is added to your Google Sheet, you would specify the “row_insert” event. Once you have specified the events that should trigger your webhook, the next step is to configure your webhook.
This will involve specifying the URL of your script as well as the events that you want to be notified about. In most cases, you will want to receive notifications about all events. However, if you only want to receive notifications about specific events, you can specify those events in the “Events” field. Once you have specified the URL and events for your webhook, click on the “Create” button.
Your webhook is now created and ready to use!
How can Boltic help you in automation to Integrate Google Sheet?
Boltic delivers more with less code and less time, creates webhooks with just a few lines of code, and automatically connects to your Google Sheets. It also enables you to set up triggers and perform automated tasks such as creating new documents, updating existing documents, or sending data from one application to another.
With Boltic's powerful API integrations, you can easily integrate your Google Sheet with third-party services or applications and streamline your workflows. Boltic is designed to help you automate processes, improve productivity and save time. Get started with automation today!
Steps to follow, how to integrate with google sheets:-
Step 1: Create an account in Boltic, and then you login into the dashboard.
Step 2: In the dashboard, click on New Bolt and then add a new integration.
Step 3: Select Google Sheets from the list of clouds or otherwise search it on all.
Step 4: Connect the Google Sheets account to Boltic by providing Webhook buttons credentials.
Step 5: Create a webhook for your Google Sheet.
Step 6: Configure the URL of your script and events with your.
Step 7: Click on the ‘Create’ to finish creating the Webhooks.
Step 8: Now, your integration with Google Sheets is ready to use.
Step 9: You can now enjoy the automatic synchronisation of data between the two applications.
Step 10: Make sure to check if the webhooks are working correctly and update them as needed.
Google Sheets is a powerful tool for collecting, organising, and analysing data. This helps them save time by automating tedious tasks so they can focus on more critical tasks. Boltic's integration with Google Sheets makes it easy for users to get the most out of their automation projects.
With Boltic's help, users can quickly and easily set up powerful integrations that help them make more efficient use of their data.
Conclusion
Google Sheets Webhooks is a powerful tool that allows you to integrate data from various data sources into your desired database or destination. The integration is free and seamless, and it provides in-depth knowledge about the concepts behind every step. It also helps you understand and implement them efficiently.
With Boltic, you can easily manage both your data sources and destinations, and seamlessly visualize your data in a BI tool of your choice. Our no-code platform and user-friendly data pipeline. Additionally, Boltic will help simplify the ETL process, making it easier and faster for you to get the data you need.
drives valuable insights
Organize your big data operations with a free forever plan
An agentic platform revolutionizing workflow management and automation through AI-driven solutions. It enables seamless tool integration, real-time decision-making, and enhanced productivity
Here’s what we do in the meeting:
- Experience Boltic's features firsthand.
- Learn how to automate your data workflows.
- Get answers to your specific questions.


